Android MustHave: a script to create PNGs for all DPIs from vector and raster sources

Hi!

Today I want to share with you the script that creates icons from the most popular vector formats: .ai, .svg, .eps, .ps and some other, such as .pdf and .png.

The script converts all files with predefined file format from current directory to Android-specific resource folders: drawable-mdpi, drawable-hdpi, drawable-xhdpi, drawable-xxhdpi and drawable-xxxhdpi. Output PNG sizes are:

  • 48×48 (1.0x baseline) for medium-density
  • 72×72 (1.5x) for high-density
  • 96×96 (2.0x) for extra-high-density
  • 180×180 (3.0x) for extra-extra-high-density
  • 192×192 (4.0x) for extra-extra-extra-high-density (launcher icon only)

as Google reccomends in Supporting Multiple Screens guide.

Source code:

mkdir ../drawable-mdpi
mkdir ../drawable-hdpi
mkdir ../drawable-xhdpi
mkdir ../drawable-xxhdpi
mkdir ../drawable-xxxhdpi

for f in *.ai;
do
echo “Processing $f”
inkscape -D -w 48 -h 48 -e ../drawable-mdpi/${f/.ai}.png ./$f
inkscape -D -w 72 -h 72 -e ../drawable-hdpi/${f/.ai}.png ./$f
inkscape -D -w 96 -h 96 -e ../drawable-xhdpi/${f/.ai}.png ./$f
inkscape -D -w 180 -h 180 -e ../drawable-xxhdpi/${f/.ai}.png ./$f
inkscape -D -w 192 -h 192 -e ../drawable-xxxhdpi/${f/.ai}.png ./$f
done

NOTE:

Convertation is performed by Inkscape. If you still don’t have it, you should download it from the link above.

HOW TO USE:

Just save the code to <name>.sh and start it with bash. If you use Windows, install Cygwin. This code is tuned for .ai files, you can change it to anyone supported by Inkscape. Additional export parameters are described here.


How to create Calendar-like app widget with optimized images in the list

The process of app widgets creation is quite common and described in official docs very well. Google uses almost all the features from this guide in the Google Calendar that offers a few widgets with lists of scheduled events for nearest time.

Source code for this application is available in Google Git for everybody and it has the free license. But if you want to extend the functions and use your server API, you may encounter with some problems.

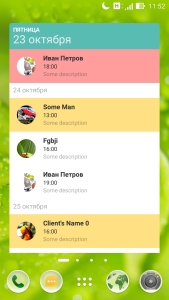
In this article I will try to write some code for widget with a list of images using RemoteViewsFactory. App widget will load the data about my meetings for the next week.

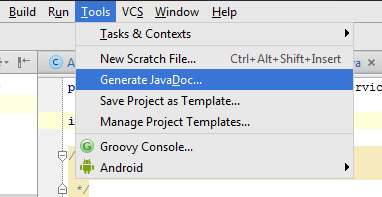
First of all, you should be familiar with appwidget’s Google guide.  Second, create your project and configure app widget as usual. Then let’s write some code for AppWidgetProvider:

public class AppWidgetProvider extends android.appwidget.AppWidgetProvider
{
    private static String APP_WIDGET_UPDATE = "your.package.name.MY_APPWIDGET_UPDATE";
    public static final long UPDATE_TIME_MILLIS = 15 * 60 * 1000; // 15 minutes

    @Override
    public void onUpdate(Context context, AppWidgetManager appWidgetManager, int appWidgetIds[])
    {
        final int N = appWidgetIds.length;
        for (int i = 0; i < N; i++)
        {
            int appWidgetId = appWidgetIds[i];
            RemoteViews views = new RemoteViews(context.getPackageName(), R.layout.appwidget);
            appWidgetManager.updateAppWidget(appWidgetId, views);
            updateAppWidget(context, appWidgetManager, appWidgetId);
        }
    }

    public static void updateAppWidget(Context context,
                                       AppWidgetManager appWidgetManager,
                                       int appWidgetId)
    {
        Intent updateIntent = new Intent(context, AppWidgetRefreshService.class);
        updateIntent.putExtra(AppWidgetManager.EXTRA_APPWIDGET_ID, appWidgetId);
        updateIntent.setData(Uri.parse(updateIntent.toUri(Intent.URI_INTENT_SCHEME)));
        RemoteViews views = new RemoteViews(context.getPackageName(), R.layout.appwidget);

        // Calendar header
        Calendar calendar = Calendar.getInstance();
        //long millis = calendar.getTimeInMillis();
        final String dayOfWeek = calendar.getDisplayName(Calendar.DAY_OF_WEEK,
                Calendar.LONG, Locale.getDefault());
        final String date = Utils.getReadableDate(calendar.getTime());
        views.setTextViewText(R.id.day_of_week, dayOfWeek);
        views.setTextViewText(R.id.date, date);
        // Attach to list of events
        views.setRemoteAdapter(R.id.events_list, updateIntent);
        appWidgetManager.notifyAppWidgetViewDataChanged(appWidgetId, R.id.events_list);

        // Launch calendar app when the user taps on the header
        final Intent launchServiceIntent = new Intent(Intent.ACTION_VIEW);
        launchServiceIntent.setClass(context, MainActivity.class);
        final PendingIntent launchCalendarPendingIntent = PendingIntent.getActivity(
                context, 0 /* no requestCode */, launchServiceIntent, 0 /* no flags */);
        views.setOnClickPendingIntent(R.id.header, launchCalendarPendingIntent);

        // Each list item will call setOnClickExtra() to let the list know
        // which item
        // is selected by a user.
        final PendingIntent updateEventIntent = getLaunchPendingIntentTemplate(context);
        views.setPendingIntentTemplate(R.id.events_list, updateEventIntent);
        appWidgetManager.updateAppWidget(appWidgetId, views);
    }

    /**
     * Build a {@link PendingIntent} to launch the Calendar app. This should be used
     * in combination with {@link RemoteViews#setPendingIntentTemplate(int, PendingIntent)}.
     */
    public static PendingIntent getLaunchPendingIntentTemplate(Context context)
    {
        Intent launchIntent = new Intent();
        launchIntent.setFlags(Intent.FLAG_ACTIVITY_NEW_TASK | Intent.FLAG_ACTIVITY_CLEAR_TASK |
                Intent.FLAG_ACTIVITY_TASK_ON_HOME);
        launchIntent.setData(Uri.parse(launchIntent.toUri(Intent.URI_INTENT_SCHEME)));
        launchIntent.setClass(context, OnItemClickActivity.class);
        return PendingIntent.getActivity(context, 0 , launchIntent,
                PendingIntent.FLAG_UPDATE_CURRENT);
    }

    private static PendingIntent createClockTickIntent(Context context)
    {
        Intent intent = new Intent(APP_WIDGET_UPDATE);
        PendingIntent pendingIntent = PendingIntent.getBroadcast(context, 0,
                intent, PendingIntent.FLAG_UPDATE_CURRENT);
        return pendingIntent;
    }

    public static void startAppWidgetUpdater(Context context)
    {
        AlarmManager alarmManager = (AlarmManager) context.getSystemService(Context.ALARM_SERVICE);
        alarmManager.setRepeating(AlarmManager.RTC,
                System.currentTimeMillis(),// start with now
                UPDATE_TIME_MILLIS,
                createClockTickIntent(context));
    }

    public static boolean isUpdaterStarted(Context context)
    {
        return (PendingIntent.getBroadcast(context, 0, new Intent(APP_WIDGET_UPDATE),
                PendingIntent.FLAG_NO_CREATE) != null);
    }

    @Override
    public void onEnabled(Context context)
    {
        startAppWidgetUpdater(context);

        super.onEnabled(context);
    }

    @Override
    public void onDisabled(Context context)
    {
        AlarmManager alarmManager = (AlarmManager) context
                .getSystemService(Context.ALARM_SERVICE);
        alarmManager.cancel(createClockTickIntent(context));

        super.onDisabled(context);
    }

    @Override
    public void onReceive(Context context, Intent intent)
    {
        if (APP_WIDGET_UPDATE.equals(intent.getAction()))
        {
            // Get the widget manager and ids for this widget provider, then
            // call the shared
            // clock update method.
            ComponentName thisAppWidget = getComponentName(context);
            AppWidgetManager appWidgetManager = AppWidgetManager.getInstance(context);
            int ids[] = appWidgetManager.getAppWidgetIds(thisAppWidget);
            for (int appWidgetID : ids)
            {
                updateAppWidget(context, appWidgetManager, appWidgetID);
            }
        }
        else
            super.onReceive(context, intent);
    }

    /**
     * Build {@link ComponentName} describing this specific
     * {@link android.appwidget.AppWidgetProvider}
     */
    public static ComponentName getComponentName(Context context)
    {
        return new ComponentName(context, AppWidgetProvider.class);
    }
}

Android does not allow us to use widget update time less than 60 minutes. So we use AlarmManager to refresh app widget with the period we need. AlarmManager helps to save the battery and in some cases can avoid unnecessary call of expensive app widget refresh methods.

Note: always set the update frequency as less as you can!

This code creates header for widget. The header contains today’s day of week, date and starts MainActivity on click. Also we specified PendingIntent template that we will use for launching OnItemClickActivity when user touches list item.

appwidget.xml:

<?xml version="1.0" encoding="utf-8"?>

<LinearLayout
    xmlns:android="http://schemas.android.com/apk/res/android"
    android:layout_width="match_parent"
    android:layout_height="match_parent"
    android:orientation="vertical"
    android:focusable="true"
    android:clickable="true"
    >

    <!-- Header -->
    <LinearLayout
        android:id="@+id/header"
        android:layout_width="match_parent"
        android:layout_height="wrap_content"
        android:minHeight="56dip"
        android:gravity="center_vertical|start"
        android:orientation="vertical"
        android:background="@drawable/widget_header_shape">

        <TextView
            android:id="@+id/day_of_week"
            android:paddingLeft="8dip"
            android:paddingRight="8dip"
            android:paddingTop="2dip"
            android:paddingBottom="2dip"
            android:textColor="@color/appwidget_week"
            android:shadowColor="#0dffffff"
            android:shadowRadius="3"
            style="@style/WidgetDayOfWeekStyle" />

        <TextView
            android:id="@+id/date"
            android:paddingLeft="8dip"
            android:paddingRight="8dip"
            android:paddingTop="2dip"
            android:paddingBottom="2dip"
            android:textColor="@color/appwidget_month"
            style="@style/WidgetDateStyle"/>
    </LinearLayout>

    <!-- Event list -->
    <ListView
        android:id="@+id/events_list"
        android:layout_width="match_parent"
        android:layout_height="0dip"
        android:layout_weight="1"
        android:divider="@null"
        android:listSelector="@android:color/transparent"
        android:cacheColorHint="@null"
        android:background="@android:color/white"/>
</LinearLayout>

Add some code to AndroidManifest.xml:

<receiver
    android:name=".appwidget.AppWidgetProvider"
    android:label="@string/appwidget_name_large"
    android:enabled="true">
    <intent-filter>
        <action android:name="android.appwidget.action.APPWIDGET_UPDATE" />
        <action android:name="your.package.name.MY_APPWIDGET_UPDATE" />
    </intent-filter>
    <meta-data
        android:name="android.appwidget.provider"
        android:resource="@xml/appwidget_info" />
</receiver>

<service
    android:name=".appwidget.AppWidgetRefreshService"
    android:permission="android.permission.BIND_REMOTEVIEWS"
    android:exported="false"/>

<receiver android:name=".appwidget.AppWidgetRefreshService$CalendarFactory"
          android:permission="android.permission.BIND_REMOTEVIEWS">
    <intent-filter>
        <action android:name="your.package.name.MY_APPWIDGET_UPDATE" />
    </intent-filter>
</receiver>

Here we have one additional receiver for custom intent your.package.name.MY_APPWIDGET_UPDATE that we use for fire from AlarmManager.

Now all components are ready for custom RemoteViewsService that will contain a list of scheduled meetings from server.

public class AppWidgetRefreshService extends RemoteViewsService
{
    private static final String TAG = "MY_APPWIDGET_UPDATE";
    @Override
    public RemoteViewsFactory onGetViewFactory(Intent intent)
    {
        return new CalendarFactory(getApplicationContext(), intent);
    }

    public static class CalendarFactory extends BroadcastReceiver implements
            RemoteViewsService.RemoteViewsFactory
    {
        private Context mContext;
        private Resources mResources;
        private int mAppWidgetId;
        private int mStandardColor;
        private int mFadedColor;

        private static List<Event> queryResults = new ArrayList<>();

        private LruCache<String, Bitmap> bitmapLruCache;

        public CalendarFactory() {
            // This is being created as part of onReceive
        }

        protected CalendarFactory(Context context, Intent intent)
        {
            mContext = context;
            mResources = context.getResources();
            mAppWidgetId = intent.getIntExtra(
                    AppWidgetManager.EXTRA_APPWIDGET_ID, AppWidgetManager.INVALID_APPWIDGET_ID);

            mStandardColor = mResources.getColor(R.color.appwidget_item_standard_color);
            mFadedColor = mResources.getColor(R.color.appwidget_item_declined_color);
            initializeCache();
        }

        protected void initializeCache()
        {
            final int maxMemory = (int) (Runtime.getRuntime().maxMemory() / 1024);

            // Use 1/10th of the available memory for this memory cache.
            final int cacheSize = maxMemory / 10;

            bitmapLruCache = new LruCache<String, Bitmap>(cacheSize)
            {
                @Override
                protected int sizeOf(String key, Bitmap bitmap) {
                    // The cache size will be measured in kilobytes rather than
                    // number of items.
                    return bitmap.getByteCount() / 1024;
                }
            };
        }
        @Override
        public void onCreate()
        {
            loadData();
        }

        @Override
        public void onDataSetChanged()
        {
            Log.d(TAG, "onDataSetChanged");
        }

        @Override
        public void onDestroy()
        {
        }

        @Override
        public RemoteViews getLoadingView()
        {
            RemoteViews views = new RemoteViews(mContext.getPackageName(),
                    R.layout.appwidget_loading);
            return views;
        }

        @Override
        public RemoteViews getViewAt(int position)
        {
            // we use getCount here so that it doesn't return null when empty
            if (position < 0 || position >= getCount()) return null;

            if (queryResults == null)
            {
                return new RemoteViews(mContext.getPackageName(),
                        R.layout.appwidget_loading);
            }
            if (queryResults.isEmpty())
            {
                return new RemoteViews(mContext.getPackageName(),
                        R.layout.appwidget_no_events);
            }

            final RemoteViews views;
            views = new RemoteViews(mContext.getPackageName(), R.layout.widget_item);

            final Event event = queryResults.get(position);
            if(event == null) return views;

            if(position == 0)
                if(!Utils.dateOfSameDay(event.getDate(), new Date()))
                    updateTextView(views, R.id.date,
                            View.VISIBLE, Utils.getReadableDate(event.getDate()));
                else
                    views.setViewVisibility(R.id.date, View.GONE);
            else
            {
                Event prevEvent = queryResults.get(position - 1);

                if(!Utils.dateOfSameDay(event.getDate(), prevEvent.getDate()))
                    updateTextView(views, R.id.date, View.VISIBLE,
                            Utils.getReadableDate(event.getDate()));
                else
                    views.setViewVisibility(R.id.date, View.GONE);
            }

            if (event.getState() == Event.EventState.waiting)
                views.setInt(R.id.widget_row, "setBackgroundColor",
                            mContext.getResources().getColor(event.isApprovedByMe()
                                    ? R.color.event_state_bg_yellow
                                    : R.color.event_state_bg_red));
            else
                views.setInt(R.id.widget_row, "setBackgroundResource",
                        R.drawable.agenda_item_bg_primary);

            updateTextView(views, R.id.when,
                    View.VISIBLE,
                    Utils.getReadableTime(event.getStartHour()));

            updateTextView(views, R.id.title, View.VISIBLE, event.getTitle());
            updateTextView(views, R.id.who, View.VISIBLE, event.getName());

            updateImageView(views, R.id.avatar, event.getAvatar());

            views.setInt(R.id.who, "setTextColor", mStandardColor);
            views.setInt(R.id.when, "setTextColor", mStandardColor);
            views.setInt(R.id.title, "setTextColor", mFadedColor);

            final Intent eventViewIntent = getLaunchFillInIntent(
                    mContext, event.getEventId());
            views.setOnClickFillInIntent(R.id.widget_row, eventViewIntent);
            return views;
        }

        @Override
        public int getViewTypeCount() {
            return 3;
        }

        @Override
        public int getCount()
        {
            // if there are no events, we still return 1 to represent the "no
            // events" view
            if (queryResults == null)
                return 1;

            return Math.max(1, queryResults.size());
        }

        @Override
        public long getItemId(int position)
        {
            if(queryResults == null || queryResults.isEmpty()) return 0;
            return queryResults.get(position).getEventId();//result;
        }

        @Override
        public boolean hasStableIds() {
            return true;
        }

        /**
         * Load events from server
         */
        public void loadData()
        {
            //fill the queryResults
        }

        void updateTextView(RemoteViews views, int id, int visibility, String string) {
            views.setViewVisibility(id, visibility);
            if (visibility == View.VISIBLE) {
                views.setTextViewText(id, string);
            }
        }

        void updateImageView(RemoteViews views, int resourceId, final String imageUrl)
        {
            Bitmap bitmap = bitmapLruCache.get(imageUrl);

            if (bitmap == null)
               bitmapLruCache.put(imageUrl, bitmap);
            views.setImageViewBitmap(resourceId, bitmap);
        }

        @Override
        public void onReceive(Context context, Intent intent)
        {
            mContext = context;
            loadData();
        }
    }
    /**
     * Build an {@link Intent} available to launch the Calendar app.
     * This should be used in combination with
     * If the go to time is 0, then calendar will be launched without a starting time.
     *
     */
    static Intent getLaunchFillInIntent(Context context, int id)
    {
        Intent eventViewIntent = new Intent();

        if (id != 0)
        {
            eventViewIntent.setFlags(Intent.FLAG_ACTIVITY_NEW_TASK | Intent.FLAG_ACTIVITY_CLEAR_TASK |
                    Intent.FLAG_ACTIVITY_TASK_ON_HOME);
            eventViewIntent.setClass(context, OnItemClickActivity.class);
        }
        else
        {
            // If we do not have an event id - start MainActivity
            eventViewIntent.setClass(context, MainActivity.class);
        }

        return eventViewIntent;
    }
}

First important thing in this code is caching drawables with LruCache. This approach helps us to fix weird issue with memory leak in list with images.

Second, in getViewAt method I realize grouping by the day in quite unusual manner:

            if(position == 0)
                if(!Utils.dateOfSameDay(event.getDate(), new Date()))
                    updateTextView(views, R.id.date,
                            View.VISIBLE, Utils.getReadableDate(event.getDate()));
                else
                    views.setViewVisibility(R.id.date, View.GONE);

I think when you need just a divider between days without actual grouping them (for collapse, for example), this solution is quite quick and beautiful (but follows to some excessive TextViews on the other hand).

widget_item layout:

<FrameLayout
    xmlns:android="http://schemas.android.com/apk/res/android"
    android:id="@android:id/content"
    android:layout_height="wrap_content"
    android:layout_width="match_parent"
    android:minHeight="72dp"
    android:background="@drawable/bg_event_cal_widget_holo">

    <LinearLayout
        android:layout_width="match_parent"
        android:layout_height="wrap_content"
        android:orientation="vertical">

        <TextView
            android:id="@+id/date"
            android:layout_width="wrap_content"
            android:layout_height="wrap_content"
            android:maxLines="1"
            android:textSize="14sp"
            android:ellipsize="marquee"
            android:textColor="@color/appwidget_item_declined_color"
            style="?android:attr/textAppearanceMediumInverse"
            android:visibility="gone"
            android:paddingLeft="8dp"
            android:paddingRight="8dp"
            android:paddingTop="5dp"
            android:paddingBottom="8dp"
            android:gravity="center_vertical"/>

        <LinearLayout
            android:id="@+id/widget_row"
            android:layout_height="wrap_content"
            android:layout_width="match_parent"
            android:paddingBottom="4dp"
            android:paddingTop="4dp"
            android:orientation="horizontal"
            android:minHeight="72dp" >

            <ImageView
                android:id="@+id/avatar"
                android:layout_marginLeft="16dp"
                android:layout_marginStart="16dp"
                android:layout_marginRight="16dp"
                android:layout_marginEnd="16dp"
                android:layout_width="40dip"
                android:layout_height="40dip"
                android:scaleType="fitXY"
                android:layout_gravity="center_vertical"
                android:src="@drawable/ic_launcher"/>

            <LinearLayout
                android:layout_width="wrap_content"
                android:layout_height="wrap_content"
                android:layout_gravity="center_vertical"
                android:layout_marginRight="16dip"
                android:orientation="vertical">

                <TextView
                    android:id="@+id/who"
                    android:layout_width="wrap_content"
                    android:layout_height="wrap_content"
                    android:maxLines="2"
                    android:textSize="14sp"
                    android:textStyle="bold"
                    android:ellipsize="marquee"
                    android:textColor="@color/appwidget_title"
                    style="?android:attr/textAppearanceMediumInverse" />

                <TextView
                    android:id="@+id/when"
                    android:layout_width="wrap_content"
                    android:layout_height="wrap_content"
                    android:singleLine="true"
                    android:textSize="12sp"
                    android:ellipsize="marquee"
                    android:textColor="@color/appwidget_when"
                    style="?android:attr/textAppearanceSmallInverse" />

                <TextView
                    android:id="@+id/title"
                    android:layout_width="wrap_content"
                    android:layout_height="wrap_content"
                    android:singleLine="true"
                    android:ellipsize="marquee"
                    android:paddingBottom="2dip"
                    android:textSize="12sp"
                    android:textColor="@color/appwidget_where"
                    style="?android:attr/textAppearanceSmallInverse" />
            </LinearLayout>
        </LinearLayout>
    </LinearLayout>
</FrameLayout>

Third, I intentionally keep the code that use my Event class fields with aim of showing you how to change some TextView and ImageView properties in RemoteViews. I believe the sense of this code is clear.

The result is:

Screenshot_2015-10-23-11-52-50

How to get the REAL device time with wrong time zone

The casual approach to time management in Android device is to turn on “Automatic date & time” and “Automatic time zone” in Settings – Date & Time. But what if your user who live in Helsinki (GMT+3) will move to Beijing(GMT+8), unsets both checkboxes, leaves Helsinki’s time zone intact and just adds 5 hours to his current time?

“It’s not a problem you say and will be wrong. When your app will try to get current time using System.currentTimeMillis or Calendar.getInstance().getTimeInMillis you will get 13.00 GMT but not 18.00 GMT as you expected. All the system time functions respect the current device time zone and there is no way to get right global timestamp with wrong time zone.
So where is the solution?
  1. you may get time from Internet
  2. you may use Google Timezone API on client or server side, but the app need to know its location
  3. you can delegate all time routine to server, that will recognize client’s time zone by ip (see Ruby or PHP realizations for example).

But in spite of it all, there are many cases (offline or standalone applications, geodata absence) when the only solution is to ask people to activate time and time zone synchronization.

Drawing on image in Android

The task of drawing by fingers on already existing image meets quite often: if you need to select complex image fragment, sometimes – to emphasize or cross out something, to add the hand-written text or a smilie.

All your app needs to do is to intercept all user touch events and draw lines between two adjacent positions. But the details matter. If your source bitmap size is less, than your device screen size, everything is normal. You can just use the code below:

public boolean onTouch(View v, MotionEvent event) {
    int action = event.getAction();
    switch (action) {
    case MotionEvent.ACTION_DOWN:
      downx = event.getX();
      downy = event.getY();
      break;
    case MotionEvent.ACTION_MOVE:
      upx = event.getX();
      upy = event.getY();
      canvas.drawLine(downx, downy, upx, upy, paint);
      choosenImageView.invalidate();
      downx = upx;
      downy = upy;
      break;
    case MotionEvent.ACTION_UP:
      upx = event.getX();
      upy = event.getY();
      canvas.drawLine(downx, downy, upx, upy, paint);
      choosenImageView.invalidate();
      break;
    case MotionEvent.ACTION_CANCEL:
      break;
    default:
      break;
    }
    return true;
  }
}

Source

But if you want to edit a huge image, than scales to your view port, you can get such result:

A complete description of this case is available on StackOverFlow

The only one solution is Matrix, that holds a 3×3 matrix for transforming coordinates from the original bitmap to your view port. Let’s create custom ImageView with proper drawing on scaled pictures:

public class DrawableImageView extends ImageView implements OnTouchListener
{
    float downx = 0;
    float downy = 0;
    float upx = 0;
    float upy = 0;
    
    Canvas canvas;
    Paint paint;
    Matrix matrix;
    
    public DrawableImageView(Context context)
    {
        super(context);
        setOnTouchListener(this);
    }
    
    public DrawableImageView(Context context, AttributeSet attrs)
    {
        super(context, attrs);
        setOnTouchListener(this);
    }

    public DrawableImageView(Context context, AttributeSet attrs,
            int defStyleAttr)
    {
        super(context, attrs, defStyleAttr);
        setOnTouchListener(this);
    }

    public void setNewImage(Bitmap alteredBitmap, Bitmap bmp)
    {
        canvas = new Canvas(alteredBitmap );
        paint = new Paint();
        paint.setColor(Color.GREEN);
        paint.setStrokeWidth(5);
        matrix = new Matrix();
        canvas.drawBitmap(bmp, matrix, paint);

        setImageBitmap(alteredBitmap);
    }
    
    @Override
    public boolean onTouch(View v, MotionEvent event)
    {
        int action = event.getAction();
        
        switch (action)
        {
        case MotionEvent.ACTION_DOWN:
            downx = getPointerCoords(event)[0];//event.getX();
            downy = getPointerCoords(event)[1];//event.getY();
            break;
        case MotionEvent.ACTION_MOVE:
            upx = getPointerCoords(event)[0];//event.getX();
            upy = getPointerCoords(event)[1];//event.getY();
            canvas.drawLine(downx, downy, upx, upy, paint);
            invalidate();
            downx = upx;
            downy = upy;
            break;
        case MotionEvent.ACTION_UP:
            upx = getPointerCoords(event)[0];//event.getX();
            upy = getPointerCoords(event)[1];//event.getY();
            canvas.drawLine(downx, downy, upx, upy, paint);
            invalidate();
            break;
        case MotionEvent.ACTION_CANCEL:
            break;
        default:
            break;
        }
        return true;
    }

    final float[] getPointerCoords(MotionEvent e)
    {
        final int index = e.getActionIndex();
        final float[] coords = new float[] { e.getX(index), e.getY(index) };
        Matrix matrix = new Matrix();
        getImageMatrix().invert(matrix);
        matrix.postTranslate(getScrollX(), getScrollY());
        matrix.mapPoints(coords);
        return coords;
    }
}

Every time when we need a proper coordinates of touch item, we ask the current transformation matrix about them in getPointerCoords method. And it works very well 🙂

More information and sample project see here.

Doing it right: vertical ScrollView with ViewPager and ListView

Yes, we cannot add one scroll item into another one. Yes, they waste your memory and bad for performance. But what if you must do this?

Let’s start with ScrollView. StackOverFlow offers us quite well method. It works, but not for using in nested fragments. Touch events in this case work awfully. The solution is here:

public class VerticalScrollView extends ScrollView
{
   private GestureDetector mGestureDetector;
    View.OnTouchListener mGestureListener;

    public VerticalScrollView(Context context) 
    {
        super(context);
        init(context);
    }

    public VerticalScrollView(Context context, AttributeSet attrs) 
    {
       super(context, attrs);
       init(context);
    }

    public VerticalScrollView(Context context, AttributeSet attrs, int defStyle) 
    {
       super(context, attrs, defStyle);
       init(context);
    }
    
    @Override
    public boolean onInterceptTouchEvent(MotionEvent ev) 
    {
       return super.onInterceptTouchEvent(ev) && mGestureDetector.onTouchEvent(ev);
    }

    class YScrollDetector extends SimpleOnGestureListener
    {
       @Override
        public boolean onScroll(MotionEvent e1, MotionEvent e2, float distanceX, float distanceY) 
       {             
          return Math.abs(distanceY) > Math.abs(distanceX);
        }
    }

    private void init(Context context)
    {
       mGestureDetector = new GestureDetector(context, new YScrollDetector());
        setFadingEdgeLength(0);
   }
}

We just rewrite onInterceptTouchEvent() and create own OnGestureDetector for vertical fling.

The next part is NestedListView. Original source is perfect, but not for nested fragments again. It consumes swipe events as such and all ScrollView will not move if this ListView occupies whole view rect.

Here is patched NestedListView:

public class NestedListView extends ListView implements OnTouchListener, OnScrollListener 
{
    private int listViewTouchAction;
    private static final int MAXIMUM_LIST_ITEMS_VIEWABLE = 99;

   public NestedListView(Context context, AttributeSet attrs) 
    {
        super(context, attrs);
        listViewTouchAction = -1;
        setOnScrollListener(this);
        setOnTouchListener(this);
    }

    @Override
    public void onScroll(AbsListView view, int firstVisibleItem,
            int visibleItemCount, int totalItemCount) 
    {
        if (getAdapter() != null && getAdapter().getCount() > MAXIMUM_LIST_ITEMS_VIEWABLE) 
        {
            if (listViewTouchAction == MotionEvent.ACTION_MOVE) 
            {
                scrollBy(0, -1);
            }
        }
    }

    @Override
    public void onScrollStateChanged(AbsListView view, int scrollState) 
    {
    }

    @Override
    protected void onMeasure(int widthMeasureSpec, int heightMeasureSpec) 
    {
        super.onMeasure(widthMeasureSpec, heightMeasureSpec);

        int newHeight = 0;
        final int heightMode = MeasureSpec.getMode(heightMeasureSpec);
        int heightSize = MeasureSpec.getSize(heightMeasureSpec);
        if (heightMode != MeasureSpec.EXACTLY) 
        {
            ListAdapter listAdapter = getAdapter();
            if (listAdapter != null && !listAdapter.isEmpty()) 
            {
                int listPosition = 0;
                for (listPosition = 0; listPosition < listAdapter.getCount()
                        && listPosition < MAXIMUM_LIST_ITEMS_VIEWABLE; listPosition++) 
                {
                    View listItem = listAdapter.getView(listPosition, null, this);
                    //now it will not throw a NPE if listItem is a ViewGroup instance
                    if (listItem instanceof ViewGroup) 
                    {
                        listItem.setLayoutParams(new LayoutParams(
                                LayoutParams.WRAP_CONTENT, LayoutParams.WRAP_CONTENT));
                    }
                    listItem.measure(widthMeasureSpec, heightMeasureSpec);
                    newHeight += listItem.getMeasuredHeight();
                }
                newHeight += getDividerHeight() * listPosition;
            }
            if ((heightMode == MeasureSpec.AT_MOST) && (newHeight > heightSize)) 
            {
                if (newHeight > heightSize) 
                {
                    newHeight = heightSize;
                }
            }
        } 
        else 
        {
            newHeight = getMeasuredHeight();
        }
        setMeasuredDimension(getMeasuredWidth(), newHeight);
    }

    @Override
    public boolean onTouch(View v, MotionEvent event) 
    {
        if (getAdapter() != null && getAdapter().getCount() > MAXIMUM_LIST_ITEMS_VIEWABLE) 
        {
            if (listViewTouchAction == MotionEvent.ACTION_MOVE) 
            {
                scrollBy(0, 1);
            }
        }
        return false;
    }
}

Unfortunately, ViewHolder or another ListView optimizations will not work. But it scrolls perfectly.

And a couple words about ViewPager in ScrollView. We’ve already create vertical gesture detector for ScrollView that will redirect horizontal move to ViewPager. Here is it’s code:

public class WrapContentHeightViewPager extends ViewPager 
{
    public WrapContentHeightViewPager(Context context) 
    {
        super(context);
    }

    public WrapContentHeightViewPager(Context context, AttributeSet attrs)
    {
        super(context, attrs);
    }

    @Override
    protected void onMeasure(int widthMeasureSpec, int heightMeasureSpec) 
    {
        super.onMeasure(widthMeasureSpec, heightMeasureSpec);

       int height = 0;
        for(int i = 0; i < getChildCount(); i++) 
        {
            View child = getChildAt(i);
            child.measure(widthMeasureSpec, MeasureSpec.makeMeasureSpec(0, MeasureSpec.UNSPECIFIED));
            
            int h = child.getMeasuredHeight();
            if(h > height) height = h;
        }

        heightMeasureSpec = MeasureSpec.makeMeasureSpec(height, MeasureSpec.EXACTLY);

       super.onMeasure(widthMeasureSpec, heightMeasureSpec);
    }
}

This approach gives you blank pages in unpredictable places, this will get you crazy image carousel, if you plan to load images in it’s items. Only double super.onMeasure() call will solve the problem.

Another (better) way to generate Javadoc with UML diagrams

Today I want to tell you about my favorite documentation generator. This is Doxygen.

It’s totally free, supports a lot of languages, generates graphs, can link source code and even process code without comments. The output formats are: HTML, Latex, RTF, PDF and others. Also it can be tuned for many aspects, so it’s nearly ideal!

I used Doxygen for making documents for Qt project (C++) and it had worked perfectly. To tell the truth, Doxygen is de facto standard for generating documentation from C++ source, but how it deal with Java?

Brilliantly! You need to do just four steps:

  • download and install Graphviz. I wrote about it in my previous post.
  • download and install Doxygen.
  • open doxywizard
  • specify all the options and Run – Run doxygen!

Configuring Doxygen could presents some difficulties for beginners, so I share my doxygen file, that tuned on generating RTF and html documentation with all the graphs.

Take the file, go to doxywizard and File – Open. You have to tune some fields in {}’s and fields in Expert – Project window. My changes are highlighted with red color.

Link to file.

Javadoc with UML diagrams for Android project using (almost) only Gradle!

One of the important moments of documenting source code is creation UML diagrams. UML diagrams – a simple, unified and at the same time powerful means of description your of project from different sides.

Well, the project have written and commented in javadoc manner, how can you create and insert charts in documentation? You need a software, that makes reverse-engineering work for you. In Android case, actually, your choice is not so great: there are about five free solutions for convert your source code in javadoc with UML diagrams, but they are quite mighty.

In this post I show you how to use UMLGraph with Gradle to build docs from console.

  • first of all, you should download and install Graphviz. Graphviz is open source graph visualization software that process the output of UML doclet to png image diagram.
  • open build.gradle of your app module and add this code:
    allprojects {
    configurations {
        umljavadoc
    }

    dependencies {
        umljavadoc 'org.umlgraph:umlgraph:5.6'
    }

    //
    // While javadoc is not typically dependent on compilation, the compile steps
    // sometimes generate some sources that we wish to have in the Javadoc.
    //
    task javadoc(overwrite: true, dependsOn: build) {
        setDescription('Generates Javadoc API documentation with UMLGraph diagrams')
        setGroup(JavaBasePlugin.DOCUMENTATION_GROUP)

        doLast {
            def javaFilePath = file('src/main/java')
            if (javaFilePath.exists())
            {
                ant.javadoc(classpath: "{path_to_android_sdk}/android.jar",
                        sourcepath: file('src/main/java'),
                        packagenames: '*',
                        destdir: "{path_to_project}/javadoc",
                        private: 'true',
                        docletpath: configurations.umljavadoc.asPath,
                        charset: 'UTF-8',
                        encoding: 'UTF-8',
                        docencoding: 'UTF-8') {
                    doclet(name: 'org.umlgraph.doclet.UmlGraphDoc')
                            {
                                param(name: '-nodefontsize', value: '9')
                                param(name: '-nodefontpackagesize', value: '7')
                                param(name: '-qualify')
                                param(name: '-postfixpackage')
                                param(name: '-hide', value: 'java.*')
                                param(name: '-collpackages', value: 'java.util.*')
                                param(name: '-inferrel')
                                param(name: '-inferdep')
                                param(name: '-link', value: 'http://java.sun.com/j2se/1.5.0/docs/guide/javadoc/doclet/spec')
                                param(name: '-link', value: 'http://java.sun.com/j2se/1.5/docs/api')
                            }
                }
            }
            else
            {
                print("!!! Cannot find source path !!!");
            }
        }
    }
}
  • Specify your own classpath, destdir and other params you need.
  • open console and in project’s dir type gradlew javadoc.
  • That’s all! There is documentation with UML class diagrams in {path_to_project}/javadoc!

How to create Javadoc for Android project in Intellij IDEA

I used Eclipse in last two years, but not i have to migrate in Intellij IDEA, so i encounter some problems that /*i think*/ is quite common for beginners in this IDE.

One of the problem is automatic generation of Javadoc documentation based on my code comments. And now i show you how i did it.

  • Go to the Tools menu and select Generate JavaDoc

Post1-1

  • you will see the window like this:

Post1-2

  • choose Whole project, select all checkboxes you need
  • click on button with dots to the right of Output directory and select directory for result. I created “javadoc” folder in projects root folder.
  • and the last, but not the least… Type into Other command line arguments this parameters:

-bootclasspath [path]\android-sdk\platforms\android-{version}\android.jar -encoding UTF-8 -docencoding utf-8 -charset utf-8

bootclasspath specifies path to android jar. If you miss it, you will have hundreds of warnings and errors like ‘package android.* does not exist’ or ‘cannot find symbol’.

-encoding, -docencoding and -charset parameters are required if you use some special encodings or symbols in commets.

  • That’s all! Tap Ok and read your docs!

Post #0

Hello, world!

So, today i decided to create my first blog ever. This blog is about my programmer’s experience and /*i suppose*/ it will be useful for somebody who write some code.

In this blog i will describe /*in very-very bad english*/ all the problems i discover in green robot or in qt.

Let’s start!